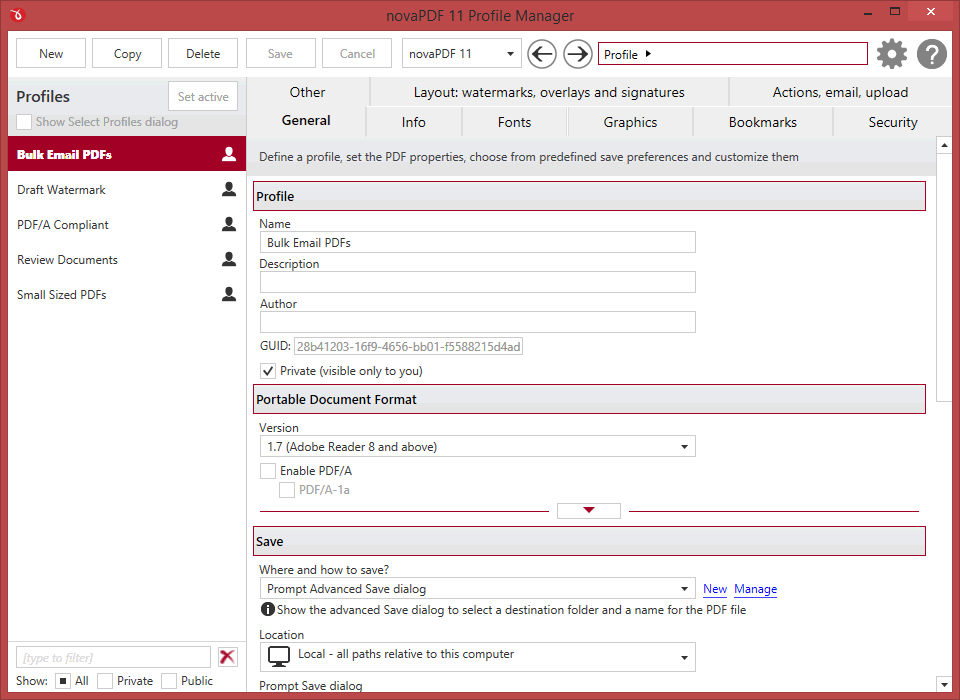
The Profile Manager allows you to manage profiles (new, copy, edit, delete), their individual settings and access profile presets. Profiles are a set of configurations that will be used when creating the PDF file. As an example you can create different printing profiles based on what the output should be: a profile that outputs PDF documents intended for distribution, or another one for high quality PDF files printing, PDFs for review, marked confidential,....
You can open Profile Manager as an administrator or as a regular user:
- to open Profile Manager as an administrator, open Printer Manager (go to Start and type "printer manager") then Profiles->Manage Profiles. If you set an administrator password, you'll be required to enter it to make changes.
- to open Profile Manager as a regular user, open Devices and Printers (go to Start and type "devices and printers"), right click on novaPDF and select Printing Preferences. Click on the Manager Profiles button.
Opening Profile Manager as an administrator gives you access to more options than when opening it as a regular user.

Profiles List
When the novaPDF is installed, a default profile is created. This profile uses its own default printing settings to create the PDF files.
However you can change those settings and create a custom profile, that when used, will create PDFs using the options you've chosen. In novaPDF there are two types of profiles, private and public:
- Private profiles. A private profile is visible only to the current user. By default new profiles are created as private and only the users from the computer where it was created will be able to see it and create PDFs using it.
- Public profiles. Public profiles are visible from all client computers (or other users on the same computer) that connect to and print via the computer where they are defined (the printer server). When a public profile will be used, all the settings from that profile will be propagated to the client computers.
This list shows the profiles (both private and public) that were defined. The icon on the right of the profile name shows what type of profile it is (public or private). You can filter the shown profiles by starting to type in the search field and also use the Public/Private checkboxes to filter them by type.
Manage Profiles
New
This will create a new profile based on the default one. You can change its settings by clicking on the different tabs available (General, Emails,...) and use the Save button to record your changes and create the profile. It is created only after you click on the Save button, if you click on Cancel or select a different profile the current one will be discarded
Copy
This allows you to duplicate an existing profile. To do so, just select an existing profile and click on Copy. Unlike the New option, when you copy an existing profile the duplicate is automatically saved with a different name (original name of the profile plus the word Copy). Removing the original profile doesn't affect in any way the existing copy of it.
Delete
Deletes the profile selected in the profiles list. You cannot delete the current active profile. You have to set another profile as active profile first. There will always be at least one profile.
Set active
Set the profile selected in the profiles list as current active profile. The active profile settings will be used in the subsequent printing jobs. Optionally you can check the Show Select Profiles dialog to show a prompt on each print job that will let you choose what profile you want to use for printing.
Show Select Profiles dialog
If this option is checked, before creating the PDF file from a document a window will prompt you to choose which profile to use for that printing job.
Advanced
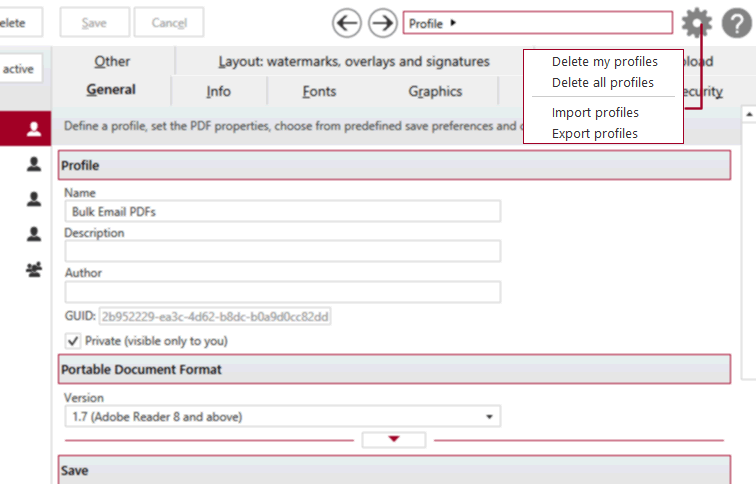
When you click on the Advanced settings icon (grey gear on the right), you will see additional options:
- Delete my profiles - if you click on this you'll get a confirmation window that lets you choose if you want to delete all your defined profiles (the private profiles). Once the profiles are deleted, they cannot be recovered anymore
- Delete all profiles - this will prompt a confirmation window to remove all the existing profiles (both private and public).

You can also click on the question mark to access the About window or open the Help file.
Profile Settings
The profile settings group allows you to customize the current profile and change various options such as the possibility to send emails, add watermarks/bookmarks/overlays, protect the PDF, embed fonts and many others. You can visit each tab and change the options for:
- General - this lets you select the profile type, describe it, set the PDF version, enable PDF linearization, set file saving options and after save actions.
- Info -you can add document information (subject, author, keywords) and set PDF viewer options.
- Fonts - this lets you embed all fonts, only subsets, protected fonts or disable embedding.
- Graphics - you can compress the content, convert or downsample images to reduce the size of the resulting PDF.
- Bookmarks - predefined bookmark configurations can be used or customized.
- Security - you can password-protect a PDF document to restrict printing, copying or even opening it.
- Other - this lets you customize the active PDF links in the resulting file and also set advanced options (such as text optimization).
- Layout: watermarks, overlays and signatures - in the Layout section you can choose display options for the resulting PDF. You can use predefined forms (or add a custom ones), page orientation (portrait/landscape), add text/image watermarks, overlays or digitally sign the PDF.
- Actions, email, upload - you can opt to send emails after a PDF is created, customize the recipients/email templates and define the SMTP server connections.
Each of the profile setting changes you modify will be available for the currently selected profile. You have to click on the Save button when you finish modifying the settings, or on Cancel if you wish to discard them all.
Profile Settings Presets
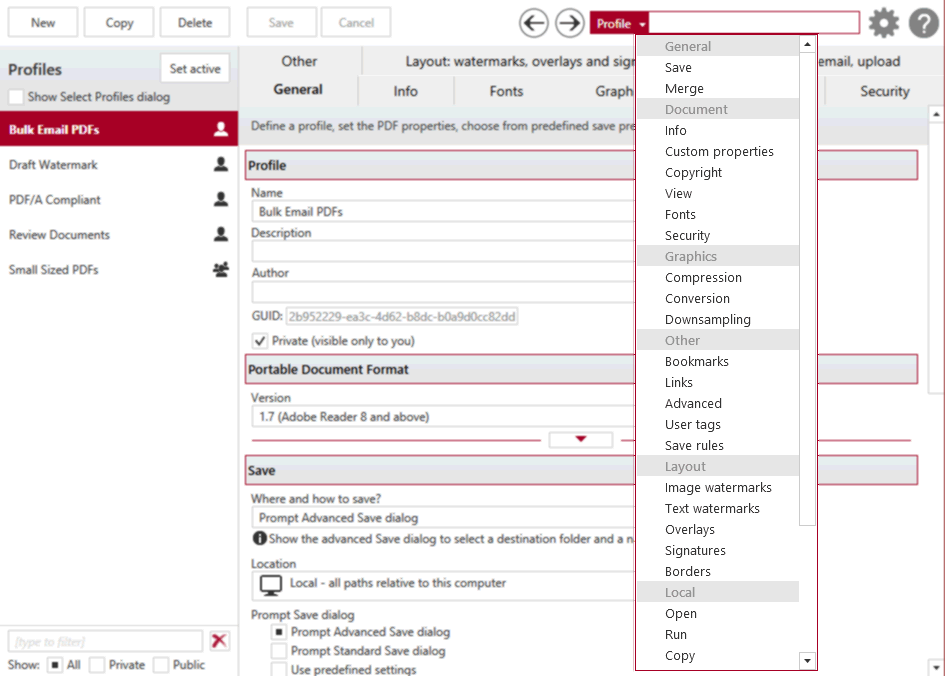
Each of the profile settings tabs uses predefined configurations for certain sections. You can modify those presets either from the profile setting tab or open the separate preset window for each individual set of options. To do so, click on the right arrow next to the Profile text field (top-right corner of the Profile Manager window). This will show a drop-down list of all the profile settings presets that you can modify individually.

Each preset created for profile settings will show up on the main tab and available as a drop-down option. For example, the presets that you create for the Save section, will show up as a drop down in General -> File saving options -> Save options. Each preset section has already defined default preset profiles, which cannot be modified. If you want to create a preset based on the default one, you can use the Copy option and Save it after you've done the necessary changes.
The navigation arrows (left/right) next to the Profile field allow you to browse between a preset profile window and the main profile settings window. You can read more about the presets in the Manage Presets help section.
Note: Some of the features mentioned on this page might not be available in your edition. The Professional edition includes all the features, while Standard and Lite have limited functionality. For a comparison between editions, please check feature matrix topic.


