novaPDF is a PDF creator that allows generating PDF files from any Windows application that supports printing. This tutorial shows how to merge PDF files with novaPDF, by adding content before, after, on front of or as a background for the existing content of a PDF file.
On this page:
novaPDF has the ability to merge PDF files. While usually the PDF merging only refers to adding pages before the content of an existing file (inserting) or adding pages after the content of an existing PDF file (appending), novaPDF Professional comes with an additional option to overlay with an existing PDF. The PDF overlay option (available only in novaPDF Professional, the insert/append are available in all editions) will add the content being converted either on front of or as a background for the content of an existing PDF. The PDF overlay option is often called PDF stitching, and you can think of it as an watermarking with the content of another PDF instead of an image or text.
Different PDF merging options that novaPDF offers:
- Insert before existing PDF file. novaPDF lets you insert content at the beginning of an existing PDF file, before its existing content.Example: You are preparing a brochure and you have a Powerpoint publication with 5 slides and a Word document with 3 pages. Instead of sending for printing first the Powerpoint and then the Word document, you can create a PDF file that combines the content. First use novaPDF to create a PDF from the Powerpoint. Second open the Word document and print it to novaPDF, but use the Insert before existing PDF file option and select the previously created PDF (from Powerpoint). novaPDF will insert the content of the Word document in the existing PDF file, creating a single document you can send for printing.
- Append to existing PDF file. If you don't want to insert content at the beginning of the PDF file, you can append it (adding after the existing content) in the PDF file.Example: Excel has an issue when printing, so if you have multiple excel sheets into one document it will create a separate PDF file for each sheet. Even if there's a workaround for this (see Printing an entire Excel workbook to a single PDF file) you can do this easier using novaPDF's Append to existing PDF option. If your excel file has 3 sheets, they will be sent for printing one after the other as separate documents, but since the filename suggestion would be the same it will append each sheet to the previous PDF document.
- PDF overlay. novaPDF Professional can add the content of an existing PDF file as the background or foreground for content being printed. Furthermore, this operation can be combined with the append/insert one. As an example, many companies require that all documents sent need to have branded headers and footers (with logo, address, ...) and they usually have a PDF template for that. If one person has an official document already created, but needs to add another page to that PDF, this can be done using the append/insert option but also in the same time adding as a background (overlaying) the PDF template to that new page, to match the format of the existing content.
How to insert/append content to an existing PDF file
When a new document is being printed, novaPDF can insert it before the content of an existing PDF file or append at the end of it. There are two ways of doing this, depending on how you have the Save options configured for novaPDF.
If you want to select manually the folder where the merged PDF will be saved:
- Open the document (word, notepad, wordpad, ...) whose content you want to merge into an existing PDF file. Go to File->Print, select novaPDF as the Printer and you'll see the standard Save dialog.
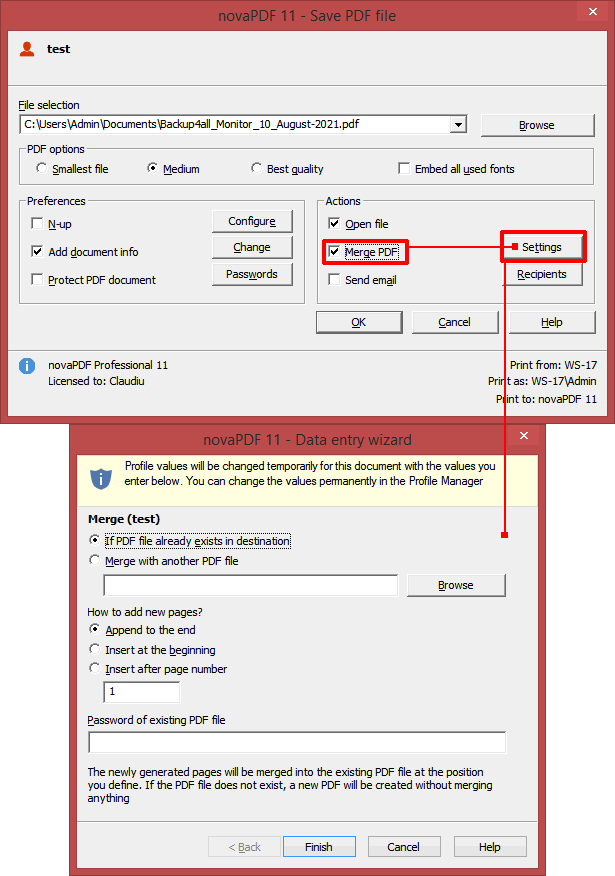
- Check the Merge PDF option and then click on its Settings button.
- Here you can configure how the merge will be done:
- If PDF file already exists in destination is checked by default. This means that if a PDF file with the same name as the one you generate already exists in the destination, it will merge the content with it.
- Merge with another PDF file. If you select this, you can Browse for an existing PDF you want to do the merge with.
- Choose if you want to insert the content at a specific page or right at the beginning, or if you'd like to Append the content at the end of the existing PDF content.
- If the existing PDF is password-protected, you'll need to enter its password in the field below the option.
- Press Finish to close the Merge settings window. If in step 3 you chose to Merge with another PDF file, just click OK and the merging will start. If you chose If PDF file already exists in destination, you'll need to use the Browse button to locate the PDF you want to merge with before clicking OK.
If you want to have documents automatically merged and saved to a specific folder, you can create a printing profile. This way, everytime you use that printing profile the PDFs will be saved to that specific folder and if files with the same name exist they will be merged. To define a PDF merging profile:
- Open Profile Manager and create a new printing profile (see this article on how to open profile manager and create a profile).
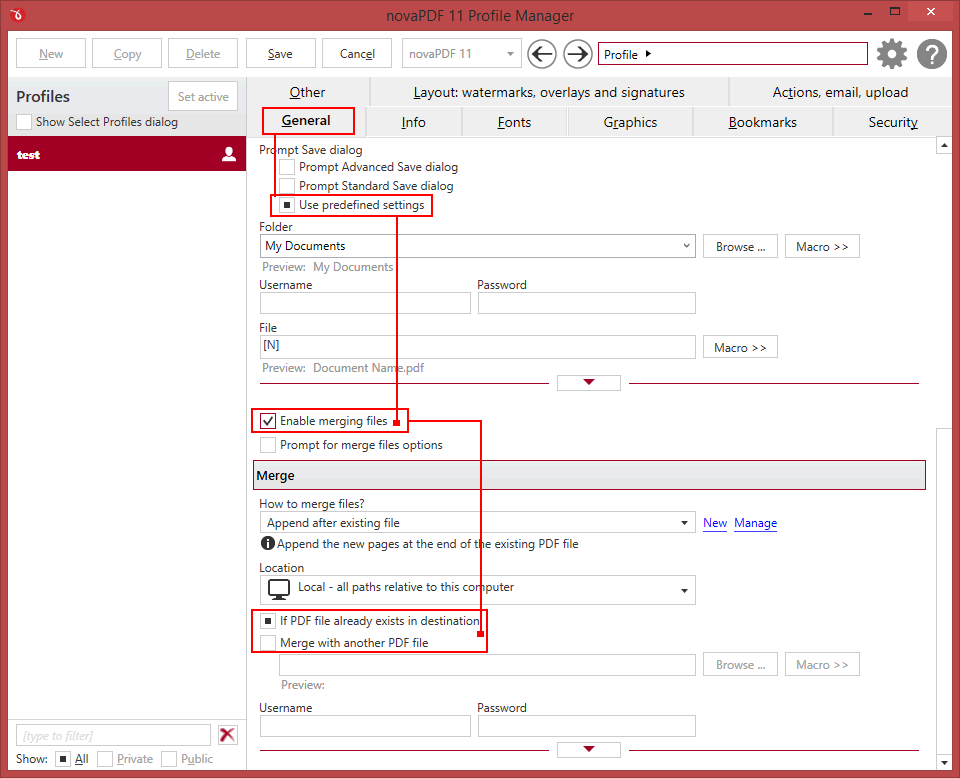
- On the General tab, select the Use predefined settings option. Select a folder where you want the PDF files to be automatically saved in. The File name macro will automatically use the name of the file being printed as the name of the resulting PDF file.
- Click on the Enable merging files option to activate the Merge settings
- In the Merge section select the merging options you want (either merging by printing to a PDF named the same or a different file). Please note that in order for the content being printed to be merged with an existing PDF file, that PDF file needs to have the same name as the one being printed, and they have to be in the same folder. For merging you can select either Insert at the beginning or Append at the end.
- Save this profile and use it for the next printing job where you want PDF files merged together (article mentioned above shows how to use a profile as an active one).
How to overlay content with an existing PDF file
PDF documents overlay (could also be called PDF stitching), means that you can insert the content of a PDF file in another PDF document (either in front of the existing content or as the background for the existing one) and create a single PDF file containing the merged information. For example, if you have a PDF template branded with your company information (that shows in the header/footer) and you received other PDF documents that need to use the same template, you can overlay the new document with the existing template and create a single merged branded PDF. The PDF Overlay option is available only in novaPDF Professional.
How to create a printing profile that uses PDF overlaying:
- Open Profile Manager to create a new profile and go to the Layout: watermarks, overlays, signatures tab (see this article on how to open profile manager and create a profile).
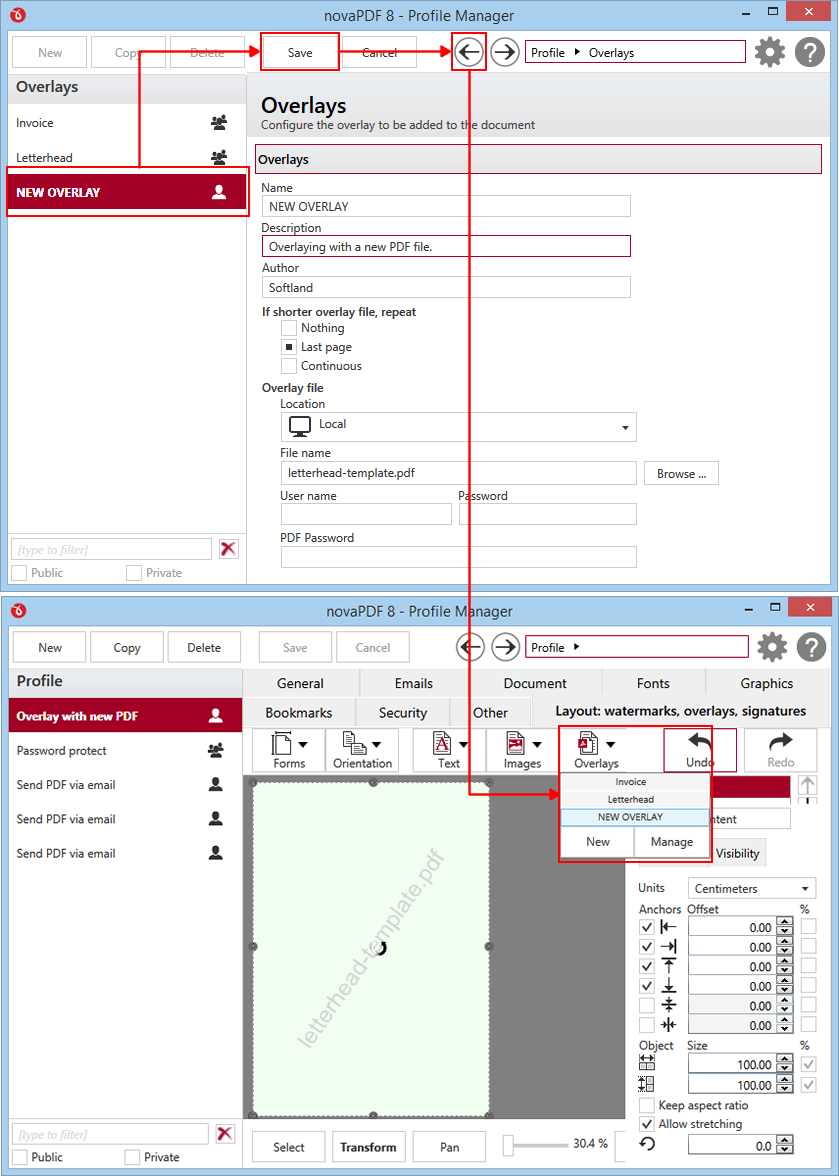
- Click on the Overlays drop-down and select one of the existing predefined overlays. If you want to create your own overlay, click on the New button to open the Overlay Presets window.
- In the Overlays preset window add a new name for your overlay preset and optionally description/author.
- In the Overlay file section you have to Browse for an existing PDF file that you want to use as an overlay template every time a print job using this overlay profile will be created. If that PDF is password protected you'll have to enter the Password for it, otherwise leave blank.
- Optionally, you can select what to do if the PDF you want to use as an overlay template is shorter then the content being printed:
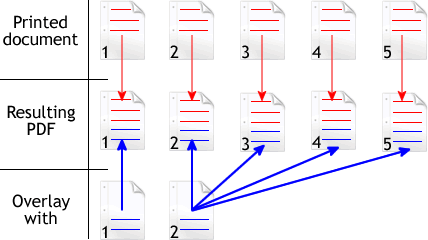
- Nothing. If the PDF file you selected to overlay with has less pages than the file you are printing and None is selected, the resulting PDF file will use as background/foreground the content of the overlayed PDF until it reaches the last page of the overlayed PDF, after that continuing without adding content from the overlayed PDF. Example: you have a document that has 5 pages and you want to overlay it with a PDF document that has 2 pages (called let's say overlay.pdf). The resulting PDF file will have 5 pages, and on the first two the content of the overlay.pdf document will be included, on the last 3 pages the content of overlay.pdf not being included at all.
![overlay none overlay none]()
- Last page. If the PDF file you selected to overlay with has less pages than the file you are printing and Last Page is selected, the resulting PDF file will use as background/foreground the content of the overlayed PDF until it reaches the last page of the overlayed PDF, after that continuing to add the content from the last page of the overlayed PDF only. Example: you have a document that has 5 pages and you want to overlay it with a PDF document that has 2 pages (called let's say overlay.pdf). The resulting PDF file will have 5 pages. On the first page, it will include the content of page 1 from overlay.pdf, on the second page it will include the content of page 2 from overlay.pdf and for the last 3 pages it will continue to include the content from page 2 of overlay.pdf (because it is the last page).
![overlay last page overlay last page]()
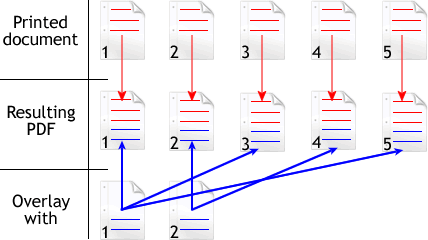
- Continuous. If the PDF file you selected to overlay with has less pages than the file you are printing and Continuous is selected, the resulting PDF file will add continuously as background/foreground the content of the overlayed PDF until it reaches the end of the resulting pdf. Example: you have a document that has 5 pages and you want to overlay it with a PDF document that has 2 pages (called overlay.pdf). The resulting PDF file will have 5 pages. On the first page, it will include the content of page 1 from overlay.pdf, on the second page it will include the content of page 2 from overlay.pdf, on the third page it will include the content of page 1 from overlay.pdf, on the fourth page it will include page 2 from overlay.pdf and on the last page it will include page 1 from overlay.pdf (overlay.pdf is added continuously always starting with the first page).
![overlay continuous overlay continuous]()
- Nothing. If the PDF file you selected to overlay with has less pages than the file you are printing and None is selected, the resulting PDF file will use as background/foreground the content of the overlayed PDF until it reaches the last page of the overlayed PDF, after that continuing without adding content from the overlayed PDF. Example: you have a document that has 5 pages and you want to overlay it with a PDF document that has 2 pages (called let's say overlay.pdf). The resulting PDF file will have 5 pages, and on the first two the content of the overlay.pdf document will be included, on the last 3 pages the content of overlay.pdf not being included at all.
After the overlay preset was created save it and go back to the printing profile. In the Overlays drop-down select the overlay preset you want to use and when you're done adjusting the layout of the overlay save the profile and close profile manager. From now on everytime you use this printing profile as the active one, your PDFs will be overlayed with the selected files.
novaPDF offers a complete PDF merging solution, because not only you can insert/append to an existing PDF file, but you can combine these operations with the PDF overlay one.


