novaPDF configuration options for digitally sign pdf documents.
On this page:
- Configure novaPDF Signature tab
- Configure novaPDF Select certificate
- Configure novaPDF Create certificate
- Configure novaPDF Customize signature
- Configure novaPDF Signature position
The Signature page of the Printing Preferences window allows you to enable and configure the options for digitally signing PDF documents. The window can be opened by choosing the Printing Preferences menu item when novaPDF is selected in the Devices and Printers window and clicking the Signature tab. This tab is also accessible from the printing Windows application in the Print dialog if you press the Properties (Preferences) button when novaPDF is selected.
Using this option you can apply a signature to a created PDF file even if the original document does not have any signatures or copyright protection. The signature will be applied automatically when the file is converted. All you have to do is to enable and customize it and all the created PDF files will contain the signature applied afterwards. The option can be disabled at any time or a separate Profile containing the option can be created and used when needed.
Configure novaPDF Signature tab
A digital PDF signature is a code that can be embedded in a portable document (PDF) so that the sender will be uniquely identified. Its main purpose is to attest that the document was indeed created by the individual / organization claiming to be the author. A digital signature contains several encryption techniques to guarantee its security. Digitally signing PDF documents is useful when using it for branding, protecting and copyrighting information in the resulting PDF file.
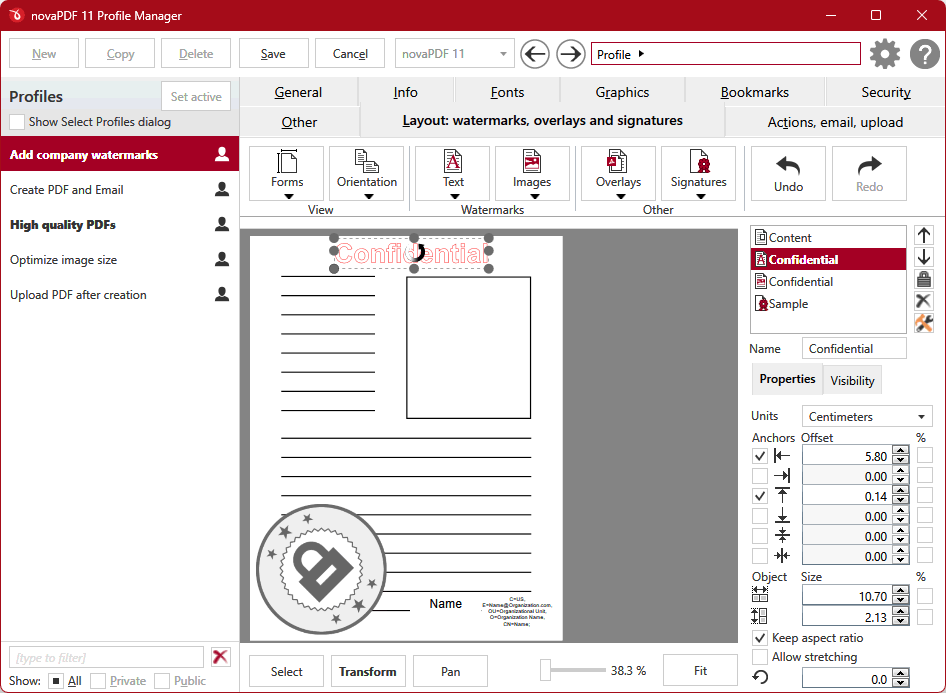
These are the main options of the Signature tab:
- Enable signatures - You can enable the Signature option by checking Enable signatures (default is unchecked). This will allow you to Browse for a system certificate that will be used to sign the PDF, or select it from a file.
- Certificate - Information in this section becomes available only if the Enable signatures option is checked.
- System certificates - Use the Browse button to select a detected system certificate. By clicking it you'll open the Select certificate window that lets you use one of the detected certificates, View, Add or Remove them.
- From file - If selected you have to use the File name field to point to a certificate stored on your local computer (or in your network). Personal Information Exchange (
*.pfx, *.p12) certificates are supported.
- File name - Use the Browse button to find and select an existing certificate. This certificate will be used to sign further created PDF files. If the file where the certificate will be used from is password protected, enter it in the Password field. To ensure you're using the correct one, hit the Preview button to see the certificate. You can also enter network paths (UNC) in the File Name field in case the file containing the signature you want to use is not on the local computer. Only a full path is allowed.
For example, suppose
\\PDF_Server\PC1 is mapped on your workstation as drive X, then the following paths are both valid and indicate the same folder: \\PDF_Server\PC1\PDF or X:\PDF. If the network file requires authentication (different from your user login) you have to click on Connect using a different user name and enter the username/password.- Preview - In the Preview section you'll see an automatically generated view based on the signature selected.
- Sign on - Choose what page from the PDF document to sign:
- First page - digitally sign only the first page of the PDF document
- Last page - apply the signature to the last page from the PDF document
- Page no. - digitally sign a specific page in the PDF document
You can use the Customize button to modify the look of the signature, and Position to choose where the signature will be displayed.
Configure novaPDF Select certificate
This window lets you choose which system certificate to use from the available ones, create a personal certificate or export a certificate. It is opened by pressing the Browse button from the System Certificates option in the Signature window.
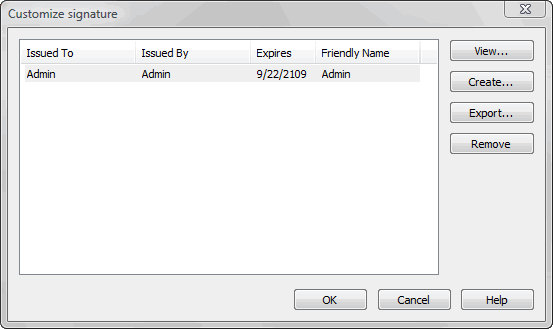
- Signatures list - The list contains information about all existing system certificates.
- Issued To - Individual or organization that the certificate was issued to
- Issued By - Individual or organization that the certificate was issued by. If it's a trusted certificate, then this column will display the top-level authority that vouches for the validity of the signer (i.e. Verisign)
- Expires - Date when the digital signature validity expires
- Friendly Name - Alias for the name of the signature
- View - This button opens a new window with details about the currently-selected certificate.
- Create - This button opens a new window (see Create certificate) and adds a new certificate at the end of the list.
- Export - You can select a certificate from the available ones and after that use the Export button to save the certificate on your disk to be either installed on another computer or for safekeeping.
The certificate will be saved as a
.cer or .p7b file, if the private key won't be exported, or as a personal information exchange file (.pfx) if the private key is exported too. Note that only personal defined certificates allow exporting the private key.- Remove - The remove button deletes the selected certificate from the list.
Configure novaPDF Create certificate
This window is used to create a personal certificate for signing PDF documents with. It is opened by pressing the Create... button from the Select certificate window.
A personal certificate defined this way is different from a trusted system certificate in terms of signature validity. When a recipient opens the PDF document signed with a personal certificate, if they don't have your private key imported as a Trusted certificate, they'll receive a notice at the top of the PDF that the signature has problems.
A trusted system certificate, if the signature didn't expire, will display a valid certificate message.
Using personal certificates is useful when you want to share a document within the same company, as you'll let your colleagues know that you are the author of the PDF document.
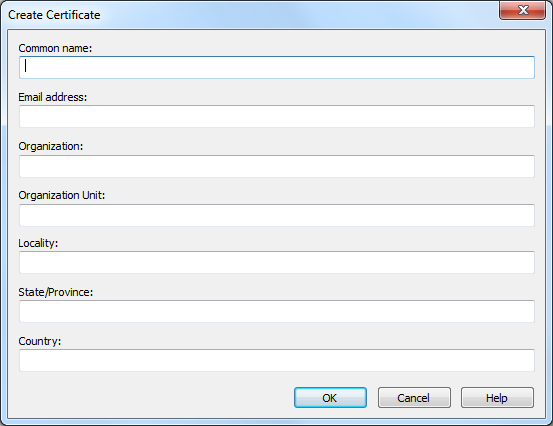
- Common name - You can enter the name of the issuer, and this is also the name that will be used for the certificate. When someone will open your signed PDF, it will show them that it was Signed by:.
- Email address - You can add an email address to be displayed in the signature.
- Organization - Enter the name of the company your system is part of (if applicable).
- Organization Unit - Enter additional information about the unit (if applicable).
- Locality - Enter the city name your organization is located in.
- State/Province - Enter the state/province your organization is located in.
- Country - Enter the country your organization is located in.
All the information entered here will be viewable by the recipient of the signed document, so accuracy is important. Once the certificate is created, it cannot be edited. To modify some of the entered information would require deleting the current defined certificate and creating a new one.
Configure novaPDF Customize signature
This window is used to customize attributes for a newly added PDF signature. It is opened by pressing the Customize... button placed on the Signature window, from the Printing Preferences dialog.
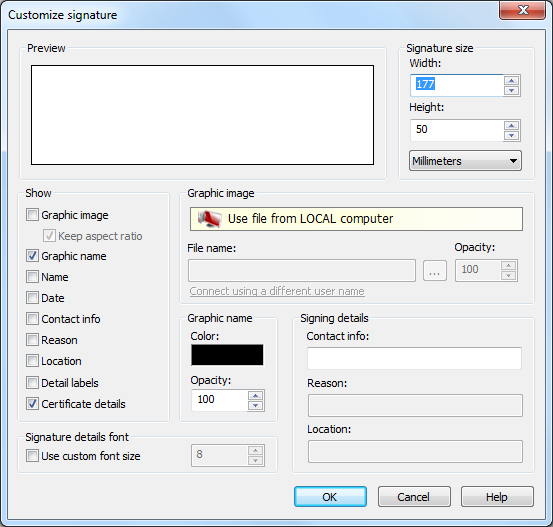
- Preview - This will show you in realtime how the signature will look.
- Signature size - This will let you modify the width and height of the signature (in millimeters, inches or point depending on your selection) if you don't want to leave the default dimensions in place.
- Show - Options in this section will let you customize the main details about the pdf signature.
- Graphic image - If this is checked you have the option to select an image to be used as a background for the signature. The image will be resized automatically to fit in that section, so by default Keep aspect ratio is checked to ensure the image won't be disproportionate.When this is checked, options under the Graphic image section will be enabled. Enter a path to the image in the File name field (or use its browse button) as well as the opacity of the image.
- Graphic name - If checked this will show as an enlarged image in the left part of the certificate, the name of the certificate (Common Name). In the Graphic name section you can also select a color for the text and its opacity.
- Name - If checked, inserts the Name of the certificate in the details section.
- Date - You can add the current date to the certificate (in the PDF it will add the date/time when the signed PDF was generated).
- Contact info - When checked, it will add in the certificate details the information entered in the Contact info field (you can add any information you consider useful in case the recipient of the digitally signed PDF wants to contact you - i.e. the email address).
- Reason - If checked, the Reason field will become enabled, and you can enter a reason for digitally signing the PDF file, so that the recipient has a better understanding of why this operation was needed. Example of reasons you could use:
- I created this document
- I have reviewed and approve this document
- This is the original document
- By adding my signature I agree with the terms and conditions presented in this document
- Location - When checked, it will add in the certificate details the location entered in the Location info field.
- Detail labels - This option will display in the certificate details section the labels for the information it contains.Example:
- CN - Common name (the name that will show up as the Signed by)
- D - Date/time the document was created and signed
- L - Location
- R - Reason
- CI - Contact info
- DTLS - Certificate details
- E - Email address
- OU - Organization unit
- O - Organization
- L - Locality
- S - State
- C - Country
- Certificate details - If checked it will display in the signature details about the certificate, such as: name of signer, email address, organization, location, .... Since many of these can be displayed by enabling them in the Show section, using them checked in combination with the Certificate details option will be redundant.
- Graphic image - If this is checked you have the option to select an image to be used as a background for the signature. The image will be resized automatically to fit in that section, so by default Keep aspect ratio is checked to ensure the image won't be disproportionate.
- Signature details font - Use custom font size - Check to override the default font size for the information displayed in the certificate details section.
Configure novaPDF Signature position
This window is used to customize the position of a digital signature in the final PDF document. It is opened by pressing the Position... button from the Signature window.
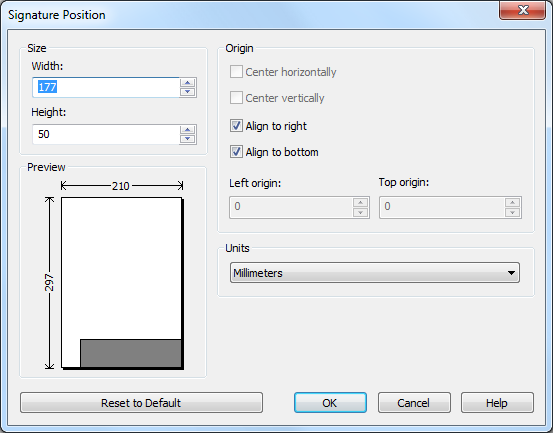
- Size - You can enter custom dimensions for the digital signature in the Width and Height fields.
- Origin - You can set here the alignment and origin of the signature to be stamped on the PDF.
- Center horizontally - If you set this option, the content of the signature to be inserted will be centered horizontally. At the same time the Align to right option will be disabled and the Left origin is calculated automatically.
- Center vertically - If you set this option, the content of the signature to be inserted will be centered vertically. At the same time the Align to bottom option will be disabled and the Top origin is calculated automatically.
- Align to right - If you set this option, the content of the signature to be inserted will be aligned to the right margin. At the same time the Center horizontally option will be disabled and the Left origin is calculated automatically.
- Align to bottom - If you set this option the content of the signature to be inserted will be aligned to the bottom margin. At the same time the Center vertically option will be disabled and the Top origin is calculated automatically.
- Left origin - The left origin for the content of the signature to be inserted. It can be modified by entering a value or pressing the Up and Down arrows if the Center horizontally and Align to right options are not set.
- Top origin - The top origin for the content of the signature to be inserted. It can be modified by entering a value or pressing the Up and Down arrows if the Center vertically and Align to bottom options are not set.
- Units - You can change the measurement units from the Units drop down list. The available values are millimeters, inches and points. Changing the units will recalculate the dimensions entered on the Custom Position page.
- Preview - You can preview changes you do on the Signature Position window without actually saving them.
- Reset to Default - Set all options to the default values (no margins and Fit whole page to margins option selected).


