This tutorial shows how to set novaPDF as a default printer. novaPDF is a PDF creator that allows generating PDF files from any Windows application that supports printing. If you don't have novaPDF installed, use the Download page to download and install it.
On this page:
During installation novaPDF offers the option to set it as the default printer. By having novaPDF set as a default printer, each time you will click the direct print button from an application a PDF file will be created instead of printing the document on a sheet through your regular printer. You will still be able to print to the other installed printers, just that an additional step of manually selecting the printer will be required. Changing the default printer is very simple and even if this article shows as an example how to set novaPDF as the default one, the process is the same for setting any other printer as the default one.
How to set novaPDF as the default printer
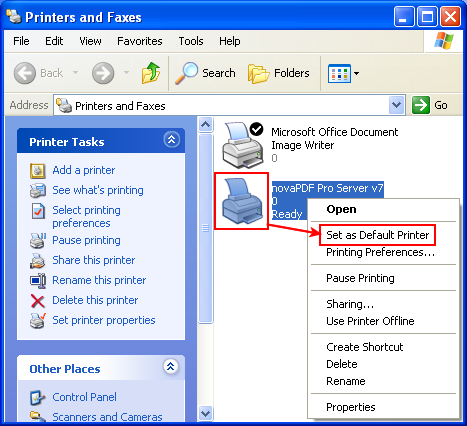
The last step of the installation wizard for novaPDF Printer is the Printer Preferences where you are asked Do you want to set novaPDF Printer as your default printer? By default novaPDF will not change the printing preferences, meaning it will be installed as an additional printer and not set as the default one, but you can set it as default by selecting Set novaPDF printer as default printer. However, in case you missed that option during installation, here are the steps needed in order to set novaPDF as a default printer on a Windows 2000/XP machine:
- Go to Start->Settings and click on Printers and Faxes
- In the Printers and Faxes window right click novaPDF Printer and select Set as Default Printer
- You'll see a small "check" mark appear in the upper-right corner of the novaPDF Printer icon (in case the View type is set to display icons) which means novaPDF Printer was successfully set as the default printer

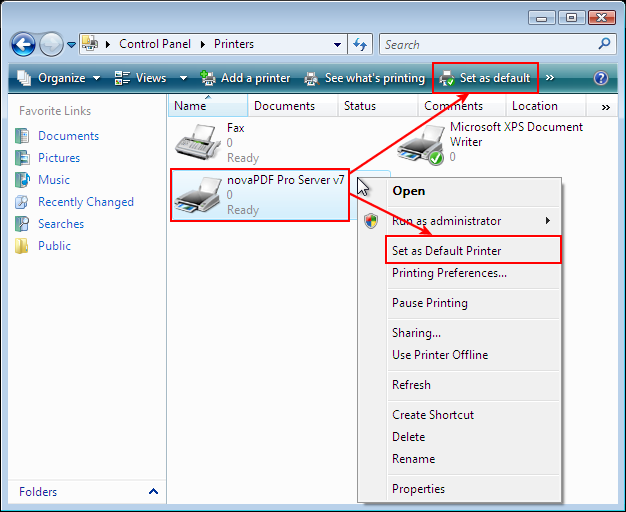
To set novaPDF as a default printer on a Windows Vista machine:
- Go to Start->Printers or if the Printers shortcut is not displayed in the Start list, go to Start click on Control Panel and double-click on Printers
- In the Printers window right click novaPDF Printer and select Set as Default Printer (or after selecting the printer you can press the Set as Default Printer button in the toolbar that is shown)
- You'll see a small check mark appear in the upper-right corner of the novaPDF Printer icon (in case the View type is set to display icons) which means novaPDF Printer was successfully set as the default printer

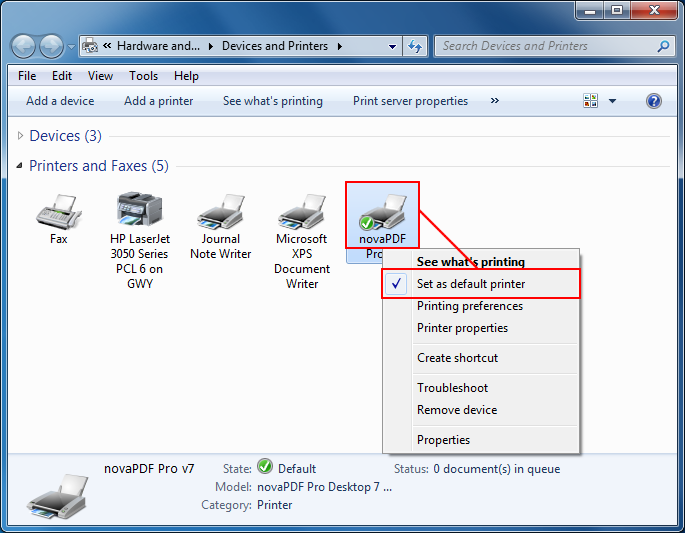
To setup novaPDF as the default printer on Windows 7:
- Go to Start and click on Devices and Printers.
- Right-click on the novaPDF icon and select Set as default printer
- A small green and white check mark will appear in the lower left corner of the icon


