Define new printing profiles or manage existing ones.
On this page:
- Configure novaPDF Profiles
- Configure New/Edit Profile main options
- Configure Advanced Options for New/Edit Profile
- Configure Copy Profile options
- Configure Import profiles options
- Configure Export profiles options
The Profiles page of the Printing Preferences allows you to add new profiles or manage existing ones (copy, edit, delete, reset), set the active profile and other options when activating a private or public profile. The profiles can be changed as per user preference.
The window can be opened by choosing the Printing Preferences menu item when novaPDF is selected in the Devices and Printers window and clicking the Profiles tab. This tab is also accessible from the printing Windows application in the Print dialog if you press the Properties (Preferences) button when novaPDF is selected.
Configure novaPDF Profiles
When the novaPDF is installed, a Default Profile is automatically created. This profile is the only profile in the beginning and its settings will be used for all novaPDF print jobs. You can later define some other profiles and choose one of them as the active profile. All defined profiles are shown in the Profiles list-view.
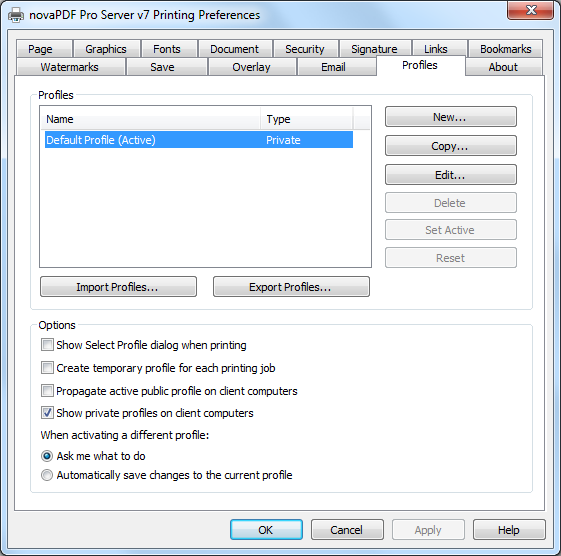
- Profiles - If you have a novaPDF Server Edition, you can create private or public profiles. Public profiles are visible from all client computers. You are only allowed to create public profiles on the printer server computer. Private profiles are visible only on the computer where they were created. These are the options from the Profile area:
- Import profiles - The Import profiles dialog window will open allowing you to import private or public profiles (public only if you are using the Server editions) from a previously exported novaPDF printing profiles list file (*.nve).
- Export profiles - The Export profiles dialog window will open allowing you to export profiles (as private or public ones) so that they could be used on another novaPDF installation after importing them.
- New - The New Profile dialog window will open allowing you to create a new profile. The new profile will have default settings on all Printing Preferences dialogs.
- Copy - The Copy Profile dialog window will open allowing you to create a new profile by copying the settings from the profile selected in the profiles list.
- Edit - The Edit Profile dialog window will open allowing you to rename the profile currently selected in the Profiles list-view, change the PDF version (
PDF 1.xorPDF/A -1bcompliancy) and other options.
- Delete - Deletes the profile selected in the profiles list. You cannot delete the current active profile. You have to set another profile as active profile first. There will always be at least one profile.
- Set Active - Set the profile selected in the profiles list as current active profile. The active profile settings will be used in the subsequent printing jobs.
- Reset - This button is enabled only for public profiles, that can be changed on client computers. On the client computer, if you changed a public profile, you can press this button to reset the options to the values from the server computer.
- Options - This group allows setting options for public profiles(available only in Server editions) and for profile activation:
- Show Select Profile dialog when printing - If this is checked, before starting the PDF printing process (after hitting the Print button) you'll get another prompt allowing you to select a profile you want to use for that particular print job.
So even if you have a profile set as default in the Printing Preferences, what you select in this Select Profile dialog is the profile that will be used for the current printing job.
- Create temporary profile for each printing job - If checked, novaPDF will attach to each PDF printing job a temporary profile. This is a safety measure, so that if you send a job for printing and you modify the profile before the printing is processed, your sent printing job will be using the profile that it had when the printing was initiated.
- Propagate active public profile on client computers - If this is checked, once a profile becomes active on the print server, it will be automatically propagated as active profile to all client computers.
- Show private profiles on client computer - Check this to allow private profiles to be defined on client computers (unchecking this will show only the public profiles on the client computers).
- When activating a different profile - When activating a different profile you may loose some changes you made to the previous active profile, if you made some changes in the Printing Preferences property sheet pages and you did not press the Apply or OK buttons. You have two options:
- Ask me what to do - let the system ask you if you want to save the changes to the previous active profile or not
- Automatically save changes to the current profile - let the system automatically save the changes to the previous active profile
Configure New/Edit Profile main options
This dialog allows choosing a type of profile and naming/renaming it.
The dialog can be opened by pressing the New or Edit button from the Profiles window in Printing Preferences.
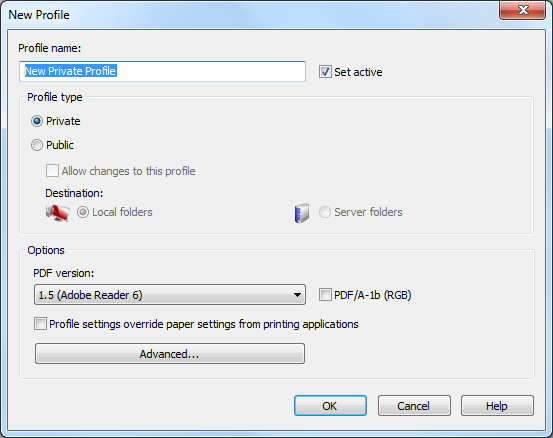
- Profile name - You can type a name for the profile you're defining.
- Set active - This is checked by default and it will set the newly defined profile (or the edited profile) as the active one.
- Profile type:
- Private - A private profile is visible only on the computer where it's created. Note that unless you have one of the Server editions, all profiles will be created as private, since only the Server editions support shared network printing.
- Public - If you have a novaPDF Server Edition, you can create private or public profiles. Public profiles are visible from all client computers. You are only allowed to create public profiles on the printer server computer. When a public profile will be used, all the settings from that profile will be propagated to the client computers.
- Allow changes to this profile - If this checkbox is checked, the settings in the public profiles can be overwritten on client computers. If this flag is not set, the public profiles cannot be modified on client computers (all Printing Preferences pages are disabled).
- Destination - When you have a public profile on a novaPDF Server Edition, you can choose where to save the generated PDF file. For private profiles, the destination is always Local and the options are grayed out, but they become active when Public profiles are selected:
- Local folders. If the destination is set to local, the file will be saved on the computer from where the print job was started.
- Server folders. If the destination is set to network, the file will be saved on the printer server computer.
- Options:
- PDF version - You can set a PDF version that will be used when creating PDF files: 1.3, 1.4, 1.5, 1.6 or 1.7. Note that a PDF created with a higher PDF version can be opened only using newer versions of PDF viewers:
- PDF 1.3 - can be opened with Adobe Reader 4 or higher
- PDF 1.4 - can be opened with Adobe Reader 5 or higher
- PDF 1.5 - can be opened with Adobe Reader 6 or higher
- PDF 1.6 - can be opened with Adobe Reader 7 or higher
- PDF 1.7 - can be opened with Adobe Reader 8 or higher
- PDF version - You can set a PDF version that will be used when creating PDF files: 1.3, 1.4, 1.5, 1.6 or 1.7. Note that a PDF created with a higher PDF version can be opened only using newer versions of PDF viewers:
- PDF/A-1b (RGB) - Check this option if you want to have the resulted PDF file compliant with the ISO standard
PDF/A-1bfor the RGB colorspace.PDF/Ais a PDF file format used for long-term archiving of documents in electronic format. It uses PDF Reference 1.4 (implemented in Adobe Acrobat 5) and complies with theISO Standard - ISO 19005-1:2005. When thePDF/A -1b(RGB) option is checked, several options will be set as default ones to ensure the compatibility: the Fonts will be Always embedded, the file links option will be unchecked (if checked previously) and all Security settings will be disabled.
- Profile settings override paper settings from printing applications - Some settings regarding page size, page orientation and resolution (see Page settings topic) can be selected also from the printing dialogs of the application you are printing from.
If you open the novaPDF Printing Preferences property sheet from the printing application, you will see the same settings automatically selected here too. But you can change them, and the changes will be taken in account when printing.
If you do not want this behavior, and you prefer to make page size selection only in novaPDF Printing Preferences property sheet, and you also want the settings you make to be remembered and used on the next printing jobs, you should check the Profile Settings Override Paper Settings From Printing Applications check box.
- Advanced - This opens the Advanced window that gives additional optimization and correction options that can be done before saving the pdf file (such as ignoring empty pages).
Configure Advanced Options for New/Edit Profile
Advanced Options is available when clicking the "Advanced..." button from the Edit Profile window . You can set some advanced options regarding how the printed documents will be processed and saved as a PDFs.
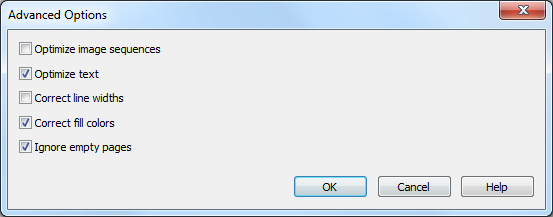
- Enable optimization of image sequences - When this option is enabled, small image sequences are combined in one big image. The process time will be slightly increased but the resulting PDF file will be smaller. You should enable this option if you have many sequences of small monochrome images and your resulting PDF file is very large. By default, this option is not enabled.
- Correct line widths - Depending on the application you print from, line widths can be sent in different ways. If lines are printed with a wrong width from a certain application, check this option to correct them.
- Correct fill colors - Depending on the application you print from, fill colors can be inverted or not. If colors are inverted in the resulted PDF when printing from a certain application, check this option to correct them.
- Optimize text - By default, novaPDF optimizes PDF size by compressing texts as much as possible. However, some fonts are not correctly defined in their font files and when applying this optimization the text may not be correct in the PDF file. Uncheck this option if the text is not correct in your PDF files. By default, this option is checked.
- Ignore empty pages - If this option is checked, the empty pages from your original document will not be added to the PDF document. But the pages have to have no information at all (no page number, no header,...)
Configure Copy Profile options
This dialog is displayed when copying a profile (public or private) and allows naming the new profile.
The dialog can be opened by selecting an existing profile and pressing the Copy button from the Profiles window in Printing Preferences.

Copy Profile - This will create a copy of the selected profile from the profiles list-view of the Profiles window. You can type a new name for this profile and when you press OK the new profile will be added to the profiles list-view. This profile will have the exact settings as the original one.
Note that you have to use a different name for the profile, because if you're entering the same name you'll get a prompt saying that there is a profile with the same name.
Configure Import profiles options
The Import profiles window allows importing printing profiles in novaPDF (from a previously exported file).
This window can be opened by pressing the Import profiles from the Profiles window in Printing Preferences.
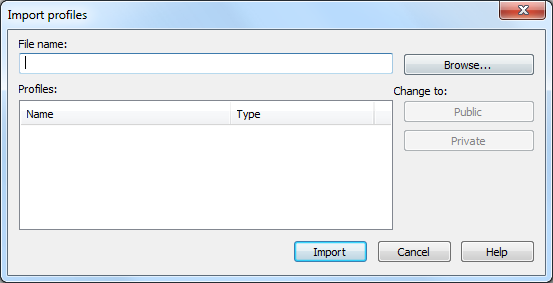
- File name - Use the Browse button to select the file that contains profiles you want to import. You can only import
.nvefiles that were previously exported from novaPDF.
- Profiles - After you have used the Browse button to select the file that contains printing profiles you want to import, a list of recognized printing profiles will be displayed in the Profiles list-view. Thick the checkbox in front of the profiles you want imported, and click on the Import button to add them as printing profiles.
If a profile with the same name already exists, you'll be asked if you want to overwrite the existing profile with the imported one (you will have to rename an existing profile if you want to import one named the same without overwriting). Public profiles can be imported only if you are using novaPDF Server Edition.
- Change type to - After the detected profiles have been listed in the Profiles list-view, you have the option of changing the type of each detected profile to Public or Private. To do so, select the profile you want to change the type to and click on the Public/Private button. The type of the profile will be changed and shown in the Type column. Public profiles can be imported only in the Server editions (trying to import a public profile in the Desktop edition will display a warning). Private profiles are visible only on the computer where they were created. Public profiles are visible from all client computers but can be used only with the Server editions.
Configure Export profiles options
The Export profiles window allows exporting printing profiles from novaPDF to a .nve file (that can be later imported in a different installation of novaPDF).
This window can be opened by pressing the Export profiles from the Profiles window in Printing Preferences.
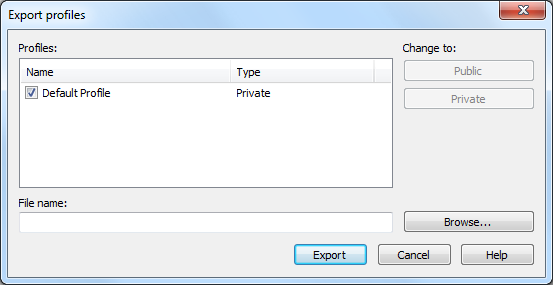
- File name - Use the Browse button to add a name and select the path where the profiles file will be saved. You can only export to
.nvefiles, a proprietary format recognized by novaPDF.
- Profiles - The Profiles list-view shows all the Profiles that were detected for this installation of novaPDF. Thick the checkbox in front of the profiles you want to export, and click on the Export button to save the selected profiles in a
.nvefile.
Furthermore, if you already have some profiles exported in a file, you can select in the File name section the same file and add more profiles to it as novaPDF will recognize its format and what profiles already exist (if a profile with the same name already exists in the output file, you'll be asked if you want to overwrite the existing profile with the newly exported one).
- Change type to - After the detected profiles have been listed in the Profiles list-view, you have the option of changing the type of each detected profile to Public or Private. To do so, select the profile you want to change the type to and click on the Public/Private button.
The type of the profile will be changed and shown in the Type column. You can export profiles as private or public no matter if you have the Server or Desktop edition, but you will not be able to import Public profiles in the Desktop editions (only in the Server ones). Private profiles are visible only on the computer where they were created. Public profiles are visible from all client computers but can be used only with the Server editions.


