The following tutorial shows how to configure the Page tab from the novaPDF Printing Preferences window. novaPDF is a PDF converter that allows creating PDF files from any Windows application that supports printing. If you don’t have novaPDF installed, use the Download page to download and install it.
On this page:
Configure the main Page tab settings
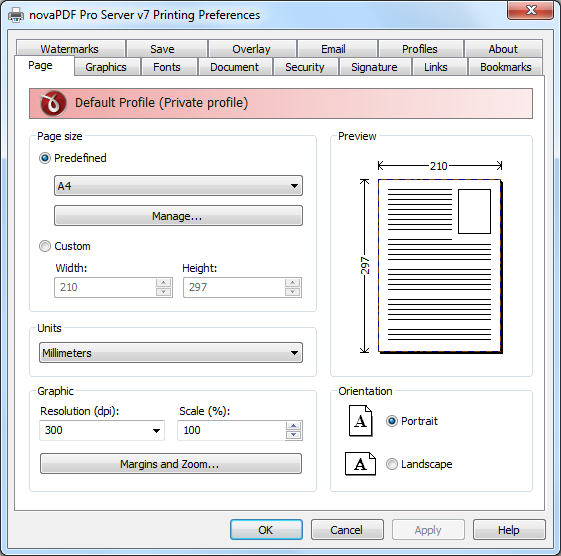
The main page of the Printing Preferences window allows you to select a predefined page size, define a custom page size, change the page orientation, preview your selection, set the resolution, scale, access the Manage Predefined Forms window and access the Margins and Zoom window.
The window can be opened by choosing the Printing Preferences menu item when novaPDF is selected in the Devices and Printers window. It is also accessible form the printing Windows application in the Print dialog if you press the Properties (Preferences) button when novaPDF is selected.

These are the settings for the Page tab:
- Page size - This group allows you to select one of the predefined page sizes or enter a custom page size. The group contains the following options:
- Predefined - You can select a predefined form from the drop downlist when this option is selected. The width and height of the selected form are shown in the fields below.
- Manage - Pressing this button will open the Manage Predefined Forms window. If you cannot find a suitable predefined form in the list above it and want to define one for future use, you should press the Manage button and create or make visible the necessary form. For more information see the Manage Predefined Forms section.
- Custom - If you want to print to a custom page size only once and don't need the same size in the future, you can select the Customize radio button and type the desired page width and height. The values will not be preserved for future use.
- Width - You can set the page width between 10 and 10000 millimeters by entering a value or pressing the Up and Down arrows. The number you enter is expressed in the selected measurement unit. The field defaults to the previously selected predefined form's width.
- Height - You can set the page height between 10 and 10000 millimeters by entering a value or pressing the Up and Down arrows. The number you enter is expressed in the selected measurement unit. The field defaults to the previously selected predefined form's height.
- Units - You can change the measurement units from the Units drop down list. The available values are millimeters, inches and points. Changing the units will recalculate the Width and Height values.
- Graphic - Specifies the resolution and scale of the document. You can also access the Margins and Zoom window from this group and you also have the following options:
- Resolution - You can set the printing resolution between 72 and 2400 dpi by selecting the default values from the drop down list or entering a different value. A smaller resolution results in smaller PDF file, but lower image quality, while a higher resolution means better image quality, but bigger PDF file. The default value is 300 dpi. The resolution can also be set from the printing application.
- Scale - You can set the scale of the document from 1% to 400% by entering a value or pressing the Up and Down arrows. The scale factor can also be set from the printing application.
- Margins and Zoom - Pressing this button will open the Margins and Zoom window where you can set position, margins, zoom, alignment and origin of the document in the PDF. For more information see the Margins and Zoom section.
- Orientation - Specifies how the page is positioned. Available options are Portrait and Landscape. The orientation can also be set from the printing application.This group contains the following options:
- Portrait - Portrait orients the print vertically (longest edge of the page is vertical).
- Landscape - Landscape orients the print horizontally (longest edge of the page is horizontal).
- Preview - Shows a graphic representation of the PDF page highlighting important settings like page size, margins and zoom.
NOTE: Some applications allow you to set page size, orientation, scale and resolution from their own printing dialogs. If you open the novaPDF Printing Preferences dialog from the printing application, you will see these settings are automatically updated on the first page. You can override them if you set the "Profile settings override paper settings from printing applications" option from the New Profile or Edit Profile window. For more information see the New/Edit Profile section.
Some of the changes you make on this page are saved in the active profile. For more details on how to manage profiles consult the Profiles section. The active profile is shown at the top of the window having in parenthesis what type of profile it is. For example if Profile1 (Private profile) is shown at the top, it means that the name of the active profile is Profile1 and it is a private profile)
Manage Predefined Forms
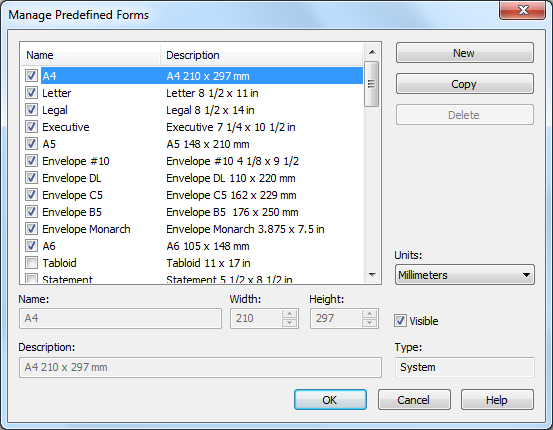
In the Manage Predefined Forms window you can view, add, copy, update and delete predefined forms (page sizes/formats).
The window can be opened by pressing the Manage button placed on the Page section of the Printing Preferences window.

These are the options for the Manage Predefined Forms area:
- Manage Predefined Forms - The list contains essential information about the existing predefined forms, their visibility, name and description. If the check box in front is checked the predefined from will be visible in the Predefined drop down list from the first page. Selecting a predefined form will show its properties in the fields below the list.
- New - Pressing the New button creates a custom predefined form. The fields below the list become enabled and the user can enter a form name, width, height, description and select the visibility.
- Copy - Pressing the Copy button creates a custom predefined form with the same properties as the selected form. The fields below the list become enabled and the user can change the name, width, height, description and select the visibility.
- Delete - Pressing the Delete button deletes the selected predefined form from the list. Only custom forms can be deleted, so the button is not enabled for system forms.
- Units - Select the measurement units for the predefined form's width and hight. The available values are millimeters, inches and points. Changing the units will recalculate the Width and Height values.
- Name - Short name of the selected predefined form. You can modify it if the selected predefined form is of custom type.
- Width - The width of the selected predefined form. You can modify it by entering a value or pressing the Up and Down arrows if the selected predefined form is of custom type.
- Height - The height of the selected predefined form. You can modify it by entering a value or pressing the Up and Down arrows if the selected predefined form is of custom type.
- Visible - The visibility flag for the selected predefined form. You can show/hide both system and custom predefined forms.
- Description - A longer description of the selected predefined form. You can modify it if the selected predefined form is of custom type.
- Type - The type of of the selected predefined form. Can be System or Custom, it cannot be changed. System forms are standard page sizes that are created when novaPDF is installed. They are usually available in all applications and cannot be modified or removed, only hidden. Custom forms are the forms created by the user. Unlike system forms, their properties can be modified by the user at any time and they can be removed.
Configure Margins and Zoom
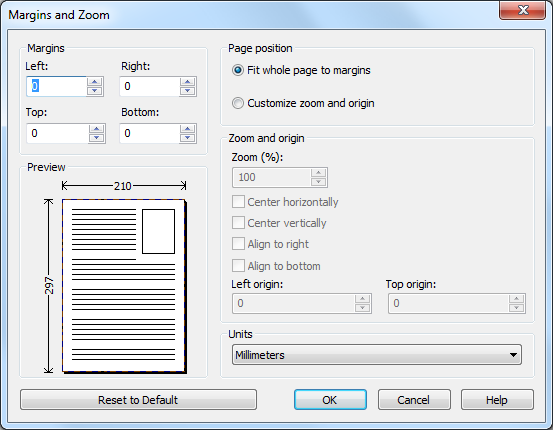
In the Margins and Zoom window you can set the position, margins, zoom, alignment and origin of the document in the PDF and preview your changes.

The window can be opened by pressing the Margins and Zoom button placed on the Page section of the Printing Preferences dialog and contains the following options:
- Margins - You can define a region around the document that will remain empty when printing. Margins can be defined for all sides individually. The numbers you enter are expressed in the selected measurement unit. The Margins area contains the following options:
- Left - You can set the left margin of the page by entering a value or pressing the Up and Down arrows. The number you enter is expressed in the selected measurement unit. The sum of the left and right margins cannot exceed 2/3 of the page width. Larger values will be adjusted automatically.
- Right - You can set the right margin of the page by entering a value or pressing the Up and Down arrows. The number you enter is expressed in the selected measurement unit. The sum of the left and right margins cannot exceed 2/3 of the page width. Larger values will be adjusted automatically.
- Top - You can set the top margin of the page by entering a value or pressing the Up and Down arrows. The sum of the top and bottom margins cannot exceed 2/3 of the page height. Larger values will be adjusted automatically.
- Bottom - You can set the bottom margin of the page by entering a value or pressing the Up and Down arrows. The sum of the top and bottom margins cannot exceed 2/3 of the page height. Larger values will be adjusted automatically.
- Page Position - You can select a simple adjustment (only by the margins) or a more complex one which involves zooming, aligning and changing the origin of the document content. The Page Position area contains the following options:
- Fit whole page to margins - If the "Fit whole page to margins" radio button is selected, the output page will be automatically zoomed so it will fit in the printing region. You can see the automatically calculated zoom percent in the Zoom field. Also the left and top origin are automatically calculated according to the left and top margins.
- Customize zoom and origin - The above behavior (when "Fit whole page to margins" is set) is probably sufficient in most of the cases. But if you want to have a more accurate control of the result, you can select the "Customize zoom and origin" radio button and manually enter zoom and page origin.
- Zoom and origin - You can set here the zoom, alignment and origin of the document content in the PDF. The controls from this group are active when "Customize zoom and origin" is set. The Zoom and origin area contains the following options:
- Zoom - When "Customize zoom and origin" is set you can set the zoom factor of the document from 1% to 400% by entering a value or pressing the Up and Down arrows. When "Fit whole page to margins" is set the zoom factor is calculated automatically.
- Center horizontally - If you set this option the contents of the document will be centered horizontally. At the same time the Align to right option will be disabled and the Left origin is calculated automatically.
- Center vertically - If you set this option the contents of the document will be centered vertically. At the same time the Align to bottom option will be disabled and the Top origin is calculated automatically.
- Align to right - If you set this option the contents of the document will be aligned to the right margin. At the same time the Center horizontally option will be disabled and the Left origin is calculated automatically.
- Align to bottom - If you set this option the contents of the document will be aligned to the bottom margin. At the same time the Center vertically option will be disabled and the Top origin is calculated automatically.
- Left origin - The left origin of the document contents. It can be modified by entering a value or pressing the Up and Down arrows if the Center horizontally and Align to right options are not set.
- Top origin - The top origin of the document contents. It can be modified by entering a value or pressing the Up and Down arrows if the Center vertically and Align to bottom options are not set.
- Units - You can change the measurement units from the Units drop down list. The available values are millimeters, inches and points. Changing the units will recalculate the margins and the origins.
- Preview - You can preview changes you do on the Margins and Zoom window without actually saving them.
- Reset to Default - Set all options to the default values (no margins and Fit whole page to margins option selected).


