Creating PDF Files
novaPDF installs itself as a virtual printer driver. To create PDF files from any application, you just have to print your documents to the novaPDF like you would print to a normal printer, or you can start the novaPDF Start page from the program group, Browse for the document you want to convert and press Create.
How to create PDF files from documents created with Microsoft Word
During installation, novaPDF will ask if you want to install an add-in for Microsoft Office. With that add-in installed, you can create PDF files from any Office application without having to go to File->Print. You just have to click on the novaPDF tab, and then on the Save as PDF button to create the PDF file.
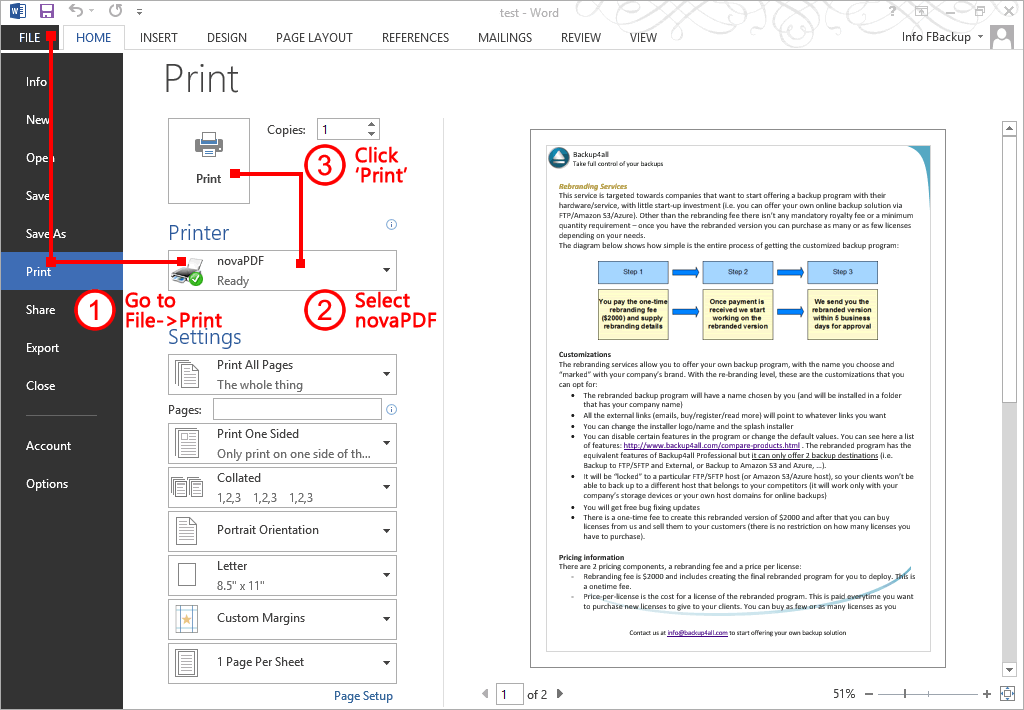
However, if you chose not to install the add-in, you can still create PDF files from all Microsoft Office applications, but in the general form that of printing to it like to a regular printing. To create PDF files from documents created with Microsoft Word (without using the add-in), follow these steps:
- Open the document that you want to convert to a PDF file
- Go to File->Print and select novaPDF from the p rinters combo-box
- Click on Print and choose a location for your PDF file

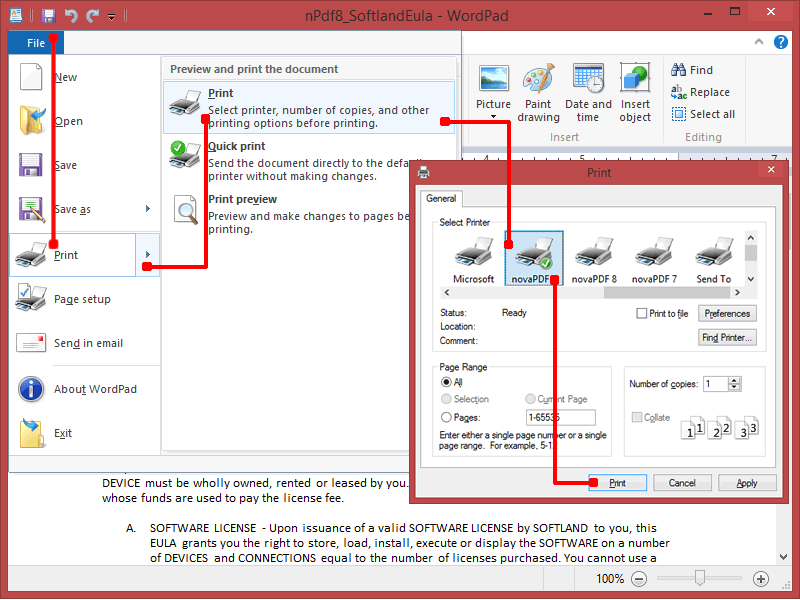
How to create PDF files from Microsoft WordPad
- Open the document that you want to convert to a PDF file
- Go to File->Print, click Print and select novaPDF from the list of printers
- Click on Print and choose a location for your PDF file

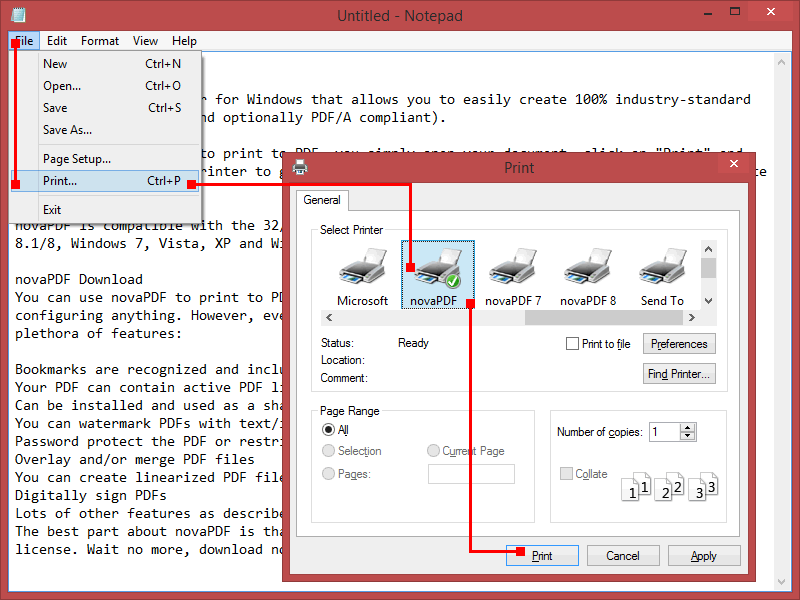
How to create PDF files from NotePad
- Open the NotePad document that you want to convert to a PDF file
- Go to File->Print and select novaPDF from the list of p rinters
- Click on Print and choose a location for your PDF file

Printing a test page
After installation you can test if novaPDF is working properly by printing a test page.
To print a test page in Windows 10/8:
- Go to Start, type printers and open from the Settings results Devices and Printers
- In the Printers section, right-click novaPDF and select Printer Properties
- In the novaPDF Printer Properties window, click on Print Test Page
- You will be prompted to select a location and name for the test PDF file. Choose one and click Save.
- After the PDF was created and saved, it will open in your default PDF reader and you will see the printed test page. If novaPDF is not registered, a notice is printed at the end of the PDF file. This can be removed from further created PDF files by purchasing a license and registering it.
To print a test page in Windows 7:
- Go to Start and click on Devices and Printers
- In the Printers window, right-click novaPDF and select Printer Properties
- In the novaPDF Printer Properties window, click on Print Test Page
- You will be prompted to select a location and name for the test PDF file. Choose one and click Save.
- After the PDF was created and saved, it will open in your default PDF reader and you will see the printed test page. If novaPDF is not registered, a notice is printed at the end of the PDF file. This can be removed from further created PDF files by purchasing a license and registering it.
To print a test page in Windows Vista:
- Go to Start and click on Printers and Faxes (if you have the Classic menu go to Start->Settings->Printers and Faxes )
- In the Printers and Faxes window, right-click novaPDF and select Properties
- In the novaPDF Properties window, click on Print Test Page
- You will be prompted to select a location and name for the test PDF file. Choose one and click Save.
- After the PDF was created and saved, it will open in your default PDF reader and you will see the printed test page. If novaPDF is not registered, a notice is printed at the end of the PDF file. This can be removed from further created PDF files by purchasing a license and registering it.
Accessing the novaPDF Printing Preferences
You can access the Printing Preferences window and change the various settings available.
To access the novaPDF Printing Preferences window in Windows 10/8:
- Go to Start, type printers and open from the Settings results Devices and Printers
- In the Printers section, right-click novaPDF and select Printing Preferences
- novaPDF Printing Preferences window will be displayed and you will have the option to change the various settings available
To access the novaPDF Printing Preferences window in Windows 7 and Vista:
- Go to Start and click on Printers
- In the Printers window, right-click novaPDF and select Printing Preferences
- novaPDF Printing Preferences window will be displayed and you will have the option to change the various settings available


