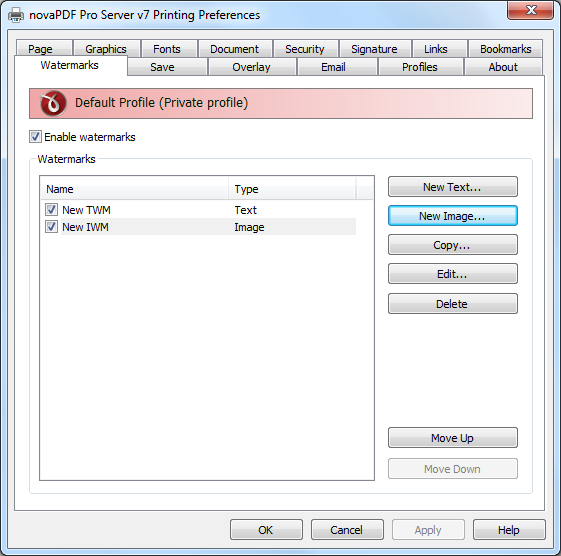
The Watermarks page of the Printing Preferences window allows you to add image and text watermarks on the generated PDF pages. The images and text can also be modified in the page as the user prefers.
On this page:
- Configure novaPDF Watermarks
- New/Edit Image Watermark in novaPDF
- New/Edit Text Watermark in novaPDF
- Configure Watermark Custom Position in novaPDF
- Configure Copy Watermark in novaPDF
The window can be opened by choosing the Printing Preferences menu item when novaPDF is selected in the Devices and Printers window and clicking the Watermarks tab. This tab is also accessible from the printing Windows application in the Print dialog if you press the Properties (Preferences) button when novaPDF is selected.
Configure novaPDF Watermarks

- Enable watermarks - You can choose to enable watermarks by checking this option. Depending on the number of added watermarks the size of the resulted PDF files will increase.
- Watermarks - You can define, copy, edit and delete watermarks and change their order in this group.
- Watermaks list - The list contains information about all watermarks. The Name column holds the watermark's name, the Type column shows the type (text or image)
- New Text - This button opens a new window and adds a new text watermark at the end of the list.
- New Image - This button opens a new window and adds a new image watermark at the end of the list.
- Copy - This button adds a new watermark with the same attributes as the selected one in the list-view. A new window is opened and you can change the attributes of the new watermark.
- Edit - This button opens a new window (edit text/image watermark) where you can modify the attributes of a text or image watermark, such as enabling or disabling the watermark, image file, transparency and position.
- Delete - The delete button remove the selected watermark from the list.
- Move Up - The watermarks are added on the PDF pages in the order they are defined in the list. If you want to bring forward one of them use the Move Up button.
- Move Down - The watermarks are added on the PDF pages in the order they are defined in the list. If you want to send to back one of them use the Move Down button.
New/Edit Image Watermark in novaPDF
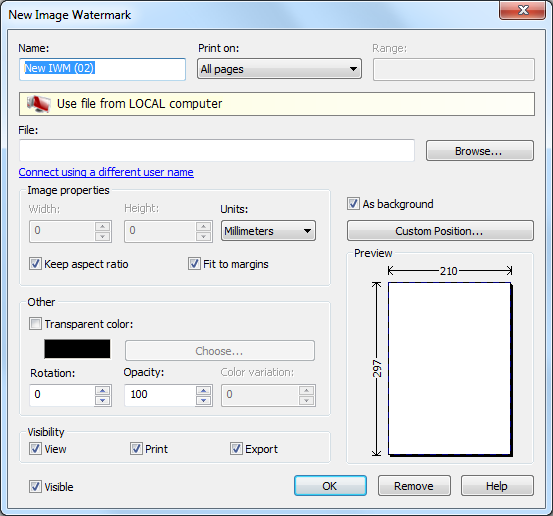
This window is used to customize attributes for a new created or an existing image watermark. It is opened by pressing the New Image, Copy or Edit buttons placed on the Watermarks window, from the Printing Preferences dialog.

- Name - Unique watermark name.
- Print On - You can select on which PDF pages to print the watermark. Available options are: All pages, Even pages, First page, Odd pages, Range.
- Range - If you selected Range from the Print On drop-down list, you can enter the page range in the next format: "2, 3, 5" or "2 - 5"
- File - Enter the path to an image file you want used as watermark, or use the Browse button to locate it. The following file formats are supported:
- Windows or OS/2 Bitmap File (*.BMP)
- DirectDraw Surface (*.DDS)
- Graphics Interchange Format (*.GIF)
- Windows Icon (*.ICO)
- Independent JPEG Group (*.JPG, *.JIF, *.JPEG, *.JPE)
- Portable Bitmap (BINARY) (*.PBM)
- Zsoft Paintbrush PCX bitmap format (*.PCX)
- Portable Network Graphics (*.PNG)
- Portable Pixelmap (BINARY) (*.PPM)
- Adobe Photoshop (*.PSD)
- Truevision Targa files (*.TGA, *.TARGA)
- Tagged Image File Format (*.TIF, *.TIFF)
- X11 Bitmap Format (*.XBM)
- Browse - Use this button to browse for an image that will be used as watermark. You can also enter network paths (UNC) in the File field in case the image you want to use is not on the local computer. Only a full path is allowed. For example, suppose
\\PDF_Server\PC1is mapped on your workstation as drive X, then the following paths are both valid and indicate the same folder:\\PDF_Server\PC1\PDForX:\PDF. If the network file requires authentication (different from your user login) you have to click onConnect using a different user nameand enter the username/password.
- Image Properties - You can set different options here for the image, like width, height, fit, units.
- Width - Width of the image expressed in the measurement unit selected from the Units drop-down list. If the Fit to margins checkbox is not checked, you can enter a value.
- Height - Width of the image expressed in the measurement unit selected from the Units drop-down list. If the Fit to margins checkbox is not checked, you can enter a value.
- Keep aspect ratio - If this option is checked, the image will be printed with the same aspect ratio as in the original image file. If the Keep aspect ratio is not checked, the image is scaled to fit the entire page. You can see how the watermark image will be printed in the Preview control. By default this option is checked.
- Fit to margins - You can choose to draw the watermark image on the entire PDF page by checking the Fit to margins checkbox. By default this option is checked.
- Units - You can select the measurement units for the width and height in the Units from this drop-down list.
- Other - This group deals with color, color variation, rotation and opacity.
- Transparent color - You can choose a color to be considered transparent color when drawing the image on the PDF page. By default, there is no transparent color.
- Rotation - You can choose a rotation angle for the image watermark. By default, there is no rotation.
- Opacity - You can select an opacity percentage for the image watermark. By default, the image watermark is drawn with maximum opacity, 100%. If you decrease the opacity value, the image will be drawn with lighter colors.
- Color variation - When you choose a transparent color you can set a slight variation that will be considered also as transparent.
- Visible - You can enable or disable the image watermark by checking/unchecking this checkbox.
- As background - If this checkbox is checked, the image watermark will be drawn on the PDF page first, under the texts and images of the printed document. If the As background checkbox is not checked, the image watermark will be drawn on the PDF page at the end, above the texts and images of the printed document.By default, the As background checkbox is checked.
- Custom position - By pressing the Custom position button a new window is opened for customizing the position where the image watermark will be drawn.
- Preview - The selected image file is drawn exactly as it will be drawn on the PDF page. The image is updated automatically when changing image watermarks attributes.
New/Edit Text Watermark in novaPDF
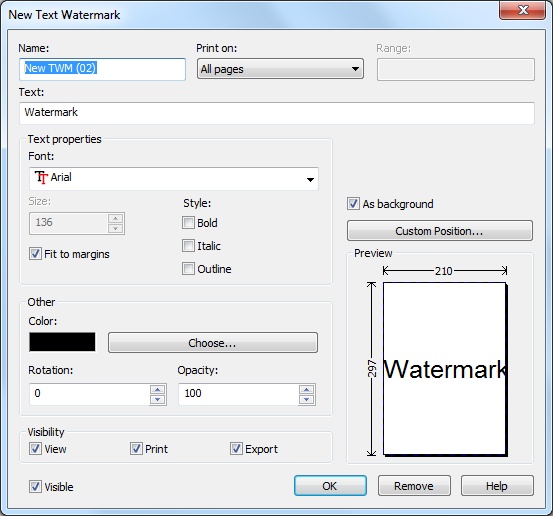
This window is used to customize attributes for a new created or an existing text watermark. It is opened by pressing the New Text, Copy or Edit buttons placed on the Watermarks window, from the Printing Preferences dialog.

- Name - Unique watermark name.
- Print On - You can select on which PDF pages to print the watermark. Available options are: All pages, Even pages, First page, Odd pages, Range.
- Range - If you selected Range from the Print On drop-down list, you can enter the page range in the next format: "2, 3, 5" or "2 - 5"
- Text - Enter the text that will be written as watermark on the PDF pages.
- Text Properties - You can set different options here for the text, like font name and style, height, fit.
- Font - Select a font from the list of the TrueType and OpenType fonts installed on your computer.
- Size - Select text height. If the Fit to margins checkbox is not checked, you can enter a value. If the Fit to margins checkbox is checked, the size is calculated automatically so the text fits the PDF page.
- Style - Bold, Italic, Outline - Select the Font style by checking corresponding check boxes. You can see in the Preview how the text will look like.
- Fit to margins - You can choose to draw the watermark text on the entire PDF page by checking the Fit to margins checkbox. By default this option is checked.
- Other - This group deals with color, rotation and opacity.
- Color - You can choose the text color. By default, the color is black.
- Rotation - You can choose a rotation angle for the text watermark. By default, there is no rotation.
- Opacity - You can select an opacity percentage for the text watermark. By default, the text watermark is drawn with maximum opacity, 100%. If you decrease the opacity value, the text will be drawn with lighter colors.
- Visible - You can enable or disable the text watermark by checking/unchecking this checkbox.
- As background - If this checkbox is checked, the text watermark will be drawn on the PDF page first, under the texts and images of the printed document. If the As background checkbox is not checked, the text watermark will be drawn on the PDF page at the end, above the texts and images of the printed document. By default, the As background checkbox is checked.
- Custom position - By pressing the Custom position button a new window is opened for customizing the position where the text watermark will be drawn.
- Preview - The watermark text is drawn as it will be drawn on the PDF page. The image is updated automatically when changing text watermarks attributes.
Configure Watermark Custom Position in novaPDF
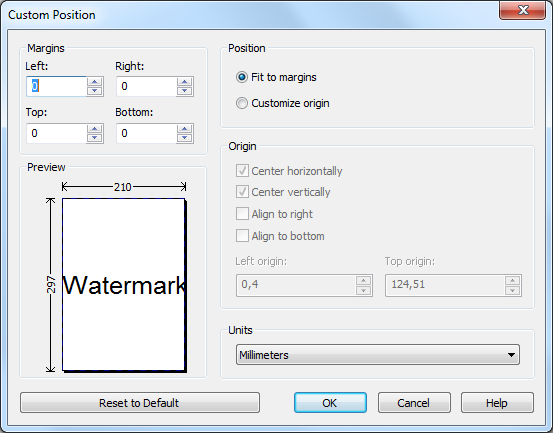
In the Custom Position window you can set the position, margins, zoom, alignment and origin of the watermark and preview your changes. The window can be opened by pressing the Custom Position button placed on the New/Edit Image Watermark dialog.

- Margins - You can define a region around the watermark that will remain empty when printing. Margins can be defined for all sides individually. The numbers you enter are expressed in the selected measurement unit.
- Left - You can set the left margin of the page by entering a value or pressing the Up and Down arrows. The number you enter is expressed in the selected measurement unit. The sum of the left and right margins cannot exceed 2/3 of the page width. Larger values will be adjusted automatically.
- Right - You can set the right margin of the page by entering a value or pressing the Up and Down arrows. The number you enter is expressed in the selected measurement unit. The sum of the left and right margins cannot exceed 2/3 of the page width. Larger values will be adjusted automatically.
- Top - You can set the top margin of the page by entering a value or pressing the Up and Down arrows. The sum of the top and bottom margins cannot exceed 2/3 of the page height. Larger values will be adjusted automatically.
- Bottom - You can set the bottom margin of the page by entering a value or pressing the Up and Down arrows. The sum of the top and bottom margins cannot exceed 2/3 of the page height. Larger values will be adjusted automatically.
- Position - You can select a simple adjustment (only by the margins) or a more complex one which involves aligning and changing the origin of the watermark.
- Fit to margins - If the Fit to margins radio button is selected, the watermark will be automatically zoomed so it will fit in the printing region.
- Customize origin - The above behavior is probably sufficient in most of the cases. But if you want to have a more accurate control of the result, you can select the "Customize origin" radio button and manually enter alignment and origin for the watermark.
- Origin - You can set here the alignment and origin of the watermark in the PDF. The controls from this group are active when "Customize origin" is set.
- Center horizontally - If you set this option the watermark will be centered horizontally. At the same time the "Align to right" option will be disabled and the "Left origin" is calculated automatically.
- Center vertically - If you set this option the watermark will be centered vertically. At the same time the "Align to bottom" option will be disabled and the "Top origin" is calculated automatically.
- Align to right - If you set this option the watermark will be aligned to the right margin. At the same time the "Center horizontally" option will be disabled and the "Left origin" is calculated automatically.
- Align to bottom - If you set this option the watermark will be aligned to the bottom margin. At the same time the "Center vertically" option will be disabled and the "Top origin" is calculated automatically.
- Left origin - The left origin of the document contents. It can be modified by entering a value or pressing the "Up" and "Down" arrows if the "Center horizontally" and "Align to right" options are not set.
- Top origin - The top origin of the document contents. It can be modified by entering a value or pressing the "Up" and "Down" arrows if the "Center vertically" and "Align to bottom" options are not set.
- Units - You can change the measurement units from the "Units" drop down list. The available values are millimeters, inches and points. Changing the units will recalculate the margins and the origins.
- Preview - You can preview changes you do on the "Custom Position" window without actually saving them.
- Reset to default - Set all options to the default values (no margins and Fit to margin option selected).
Configure Copy Watermark in novaPDF
This dialog is displayed when copying a text or image watermark and allows naming the new watermark. The dialog can be opened by selecting an existing watermark and pressing the "Copy" button from the "Watermarks" window in "Printing Preferences".

Copy Watermark - This will create a copy of the selected text or image watermark from the watermarks' list-view of the "Watermarks" window. You can type a new name for this watermark and when you press "OK" the new watermark will be added to the watermarks' list-view. This watermark will have the exact settings as the original one. Note that you have to use a different name for the watermark, because if you're entering the same name you'll get a prompt saying that there is a watermark with the same name.


