Set options for Save dialog and configure after-save actions.
On this page:
- Configure novaPDF Main Save window
- Configure novaPDF Save options
- Configure novaPDF Predefined Save options
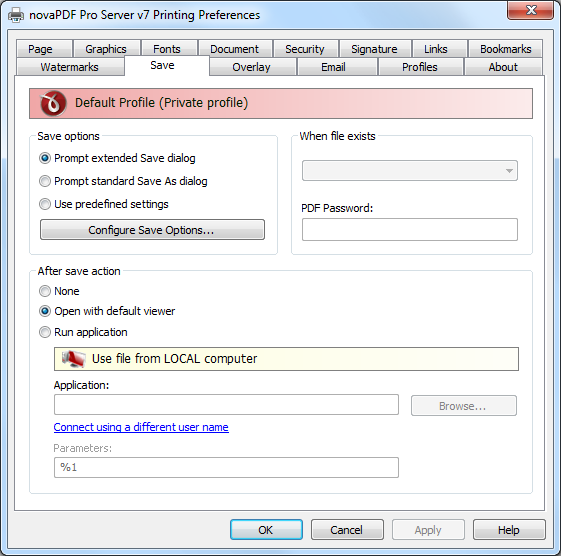
The Save page of the Printing Preferences window allows you to configure save options for the generated PDF file and add after-save actions. You can also set the auto-save feature when printing the PDF files to directly save the file in a predefined location.
The window can be opened by choosing the Printing Preferences menu item when novaPDF is selected in the Devices and Printers window and clicking the Save tab. This tab is also accessible from the printing Windows application in the Print dialog if you press the Properties (Preferences) button when novaPDF is selected.
Configure novaPDF Main Save window

- Save options - This group allows you to choose if the PDF will be automatically saved to a location or a dialog will be displayed each time.
- Prompt extended Save dialog - If this is selected, each time you will create a PDF file you will be prompted with an extended save dialog where you can manually set the destination folder and file name for the generated PDF file, whether to append or insert the content being printed to an already existing PDF file, and what to do once the PDF is created (open it with the default viewer or send it via email). Using the Configure Save Options window you can add a default path to be remembered for each time you create a PDF file, as well as to automatically assign a name for the PDF file (using macros). This way when this extended save dialog will prompt, the default path will be opened and the name auto-generated.
- Prompt standard Save As dialog - If this is selected, each time you will create a PDF file you will be prompted with the Save As dialog where you can manually set the destination folder and file name for the generated PDF files. Using the Configure Save Options window you can add a default path to be remembered for each time you create a PDF file, as well as to automatically assign a name for the PDF file. This way when the Save As dialog will prompt, the default path will be opened and the name auto-generated.
- Use predefined settings - Select this if you prefer to automatically save and name all generated PDF files in the same folder that can be defined in the Configure Save Options window.
- When file exists - This option is only displayed when you select Use predefined setting from the Save window. When a file with the same name already exists in the selected folder, you can choose one of the next actions:
- Prompt Save As dialog - a "Save as" dialog will be shown so you can change the name of the file or folder manually
- Auto number new files - a counter is added to the file name of the new generate pdf file
- Append date and time - the date and time is appended to the generated pdf file name
- Overwrite - existing file is overwritten with the new generated file
- Auto number existing files - a counter is added to the file name of the existing pdf file. The new pdf file will have the name set in this dialog
- Append to existing PDF file - if a PDF file with the same name already exists in the selected destination, the current PDF file will be merged with the existing one, adding its pages at the end of the previous existing document
- Insert before into existing PDF file - if a PDF file with the same name already exists in the selected destination, the current PDF file will be merged with the existing one, adding its pages before the content of the previous existing document
- Do not save PDF - if a PDF file with the same name already exists in the selected destination, the current PDF file will not be saved
- PDF Password - If you selected in the File Name section an already existing PDF file and you want to merge the current document with it, you'll have to enter the password needed to open the existing one (only if it's password protected). If the PDF you want to merge with is not password protected, you must leave this field empty.
- After Save Action - You can set whether to perform an action or not after the PDF file was generated and saved:
- None: no action will be performed
- Open with default viewer: if this is selected the resulting PDF file will be opened in the default viewer
- Run application: if this is selected, you can choose an application to run after the PDF if saved. You can also add some parameters that will be passed to the application when started.
You can also enter network paths (UNC) in the Application field in case the application you want to launch is not on the local computer. Only a full path is allowed. For example, suppose
\\PDF_Server\PC1 is mapped on your workstation as drive X, then the following paths are both valid and indicate the same folder: \\PDF_Server\PC1\PDF or X:\PDF. It the network file requires authentication (different from your user login) you have to click on Connect using a different user name and enter the username/password.Configure novaPDF Save options
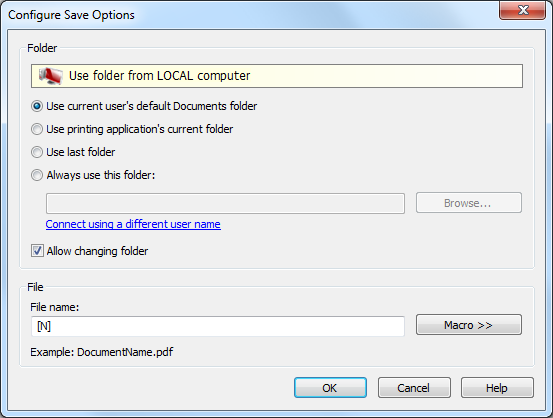
Configure Save Options is available when clicking the same named button from the Save window after selecting the Prompt standard Save As dialog or Prompt extended Save dialog option. You can set the folder where the PDF files will be saved after generation and add file-naming macros to automatically name the generated PDF.

- Folder:
- Use current user's default Documents folder - When this option is selected, the Save As dialog for the PDF file will be opened with the Documents folder selected (for the current logged in user).
- Use printing application's current folder - When this option is selected, the Save As dialog for the PDF file will be opened with the printing application's current folder selected. Use this option when you usually want to save the PDF file in the same folder as the original document that you are printing.
- Use last folder - When this option is selected, the Save As dialog for the PDF file will be opened with the last used folder selected. Use this option if you wish to save several PDF files in the same folder, or if you want to append new generated PDF files to the previous generated PDF file.
- Always use this folder - In the Folder field you can set a folder where the files will be saved. The path you enter here will be shown on the Save As dialog when printing.
- Allow changing folder - If this option is unchecked, when you print from a program and Prompt Save As dialog or Prompt extended save dialog is selected, you will not be able to change the folder where the PDF is saved from that dialog, but only the filename. If you want to be able to change the folder where the PDF is saved from that save as dialog, leave this option checked.
- File:
- File name - You can manually type a name for the generated PDF file in the File name field or use Macro to automatically name the PDF file created.
- Macros - In order to use different file names for each generated PDF files, you can use some macros in the File name field (an example of how the macros are converted is shown just below the File name field). You can select any of next macros:
- [N] - Document name
- [YMD] - Date in the format YYYYMMDD (year, month, day)
- [Y] - Year in the format YYYY
- [M] - Month in the format MM
- [D] - Day in the format DD
- [HIS] - time in the format hhmmss (hour, minute, second)
- [H] - Hour in the format hh
- [I] - Minute in the format mm
- [S] - Second in the format ss
- [C] - Counter in the format cc (it begins with 01 and increases at each printed document, if a file with the same name exists in the save folder)
- [W] - Computer name
- [U] - User name
Configure novaPDF Predefined Save options
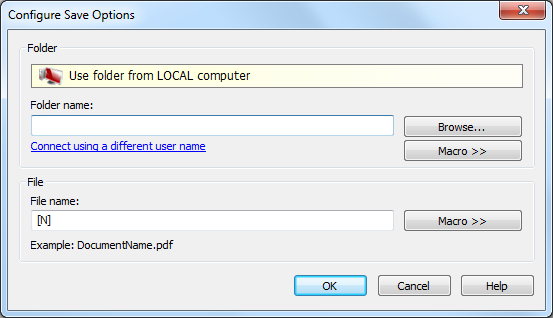
Configure Save Options is available when clicking the same named button from the Save window after selecting the Use predefined settings window. You can set the folder where the PDF files will be saved after generation, add file-naming macros to automatically name the generated PDF and choose what to do if a PDF file with the same name already exists in the destination (for instance merging the PDF files).

- Folder - In the Folder field you can set a folder where the files will be saved. The pdf files will be automatically saved in this folder without manual intervention.
You can also enter network paths (UNC path) in the Folder name field in case you want to save the PDF on another computer in your network. Only a full path is allowed. For example, suppose
\\PDF_Server\PC1 is mapped on your workstation as drive X, then the following paths are both valid and indicate the same folder: \\PDF_Server\PC1\PDF or X:\PDF. If the network file requires authentication (different from your user login) you have to click on Connect using a different user name and enter the username/password.- File name - You can manually type a name for the generated PDF file in the File name field or use Macro to automatically name the PDF file created. In order to use different file names for each generated PDF files, you can use some macros in the File name field (an example of how the macros are converted is shown just below the File name field). You can select any of next macros:
- [N] - Document name
- [YMD] - Date in the format YYYYMMDD (year, month, day)
- [Y] - Year in the format YYYY
- [M] - Month in the format MM
- [D] - Day in the format DD
- [HIS] - time in the format hhmmss (hour, minute, second)
- [H] - Hour in the format hh
- [I] - Minute in the format mm
- [S] - Second in the format ss
- [C] - Counter in the format cc (it begins with 01 and increases at each printed document, if a file with the same name exists in the save folder)
- [W] - Computer name
- [U] - User name


